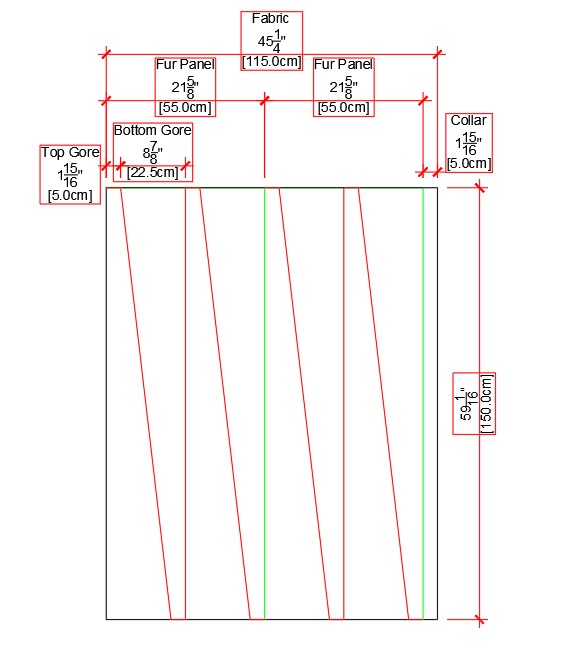
My previous Houppelandes pattens, while based on the Extant John of Gorlizt Houppelande were modified for wider width fabrics. The original had 19 trapezoid panels, 15 at 22.5cm wide and 4 at 33cm. See this pdf from Charles de Bourbon- Translated article on the Prague Houppelande or visuals on this pinterest board Early Houppelande Project
The front diagram
Whereas my pattern had 16 panels all at 15" (38cm) wide. Which resulted in a very similar amount of fabric used, and hem circumference, but took a lot less time to construct.
However my previous cutting pattern would have required more piecing to be achieved with the silk velvets of the time period, that would be limited to 54cm to 60cm wide. (Medieval textiles, Cloth of Gold, pg 9)
It also appears that fur plates began to be standardized and regulated by the guilds in the 13th and 14th century
"Skins of pured minever were about 5½ inches long and 1½ or 2 inches wide, and even to sew together the 120 skins usually put into a fur of minever of eight tiers involved the sewing of over 400 seams." (The English Fur Trade of the Later Middle Ages) So the standard width of a fur plate fell within the same 55cm to 60cm range as did the Velvets.
Also the silk velvet that I purchased is only 45" (115cm) wide. And so is the silk lining.
And the ermine plates I decided to order are 55cm wide.
So clearly my previous pattern needed revision.
And a magical thing happened.
Two of the ermine plates next to each other is 110cm, only 5cm narrower than my silk.
If I split each plate in half, and give each of my gores 5cm at the top, like the extant Houppelande, the bottom of my trapezoid panels is magical 22.5cm, also just like the extant garment.
My new pattern is going to deviate from the Extant garment.
-I am going to have 20 body panels all the same width of 22.5cm instead of 19 panels with 2 different widths. This is frankly for ease of construction and economic fabric use. It also means both the front and back will have the same number of panels. The fabric nap will follow a consistent pattern, and the center front will have a seam, which makes creating an opening and placing a collar much easier.
After laying out this pattern I can surmised how the uneven panel layout and the four pieced panels on the extant were a nessisity of needing enough fabric for the sleeves and collar, and I don’t have that limitation.
-I also am gradually increasing the length of the panels in the back, to create a train.
-I also am patterning 8 panels for each sleeve of increasing length to create the trailing Bombard or trumpet style sleeves
-I will also be creating a collar that can be buttoned, or hang open.
These things are all to better match the prevalent images and fashion of 1410-1415.

With this layout I need 8 yards of fabric, and 14 plates of fur.
Although I am still figuring out if the nap of the fur matters, if so I'll need extra and will have to piece. While standard fur plates are available for purchase we also see custom orders of individual skins for garments.
"Certain furs, having been made for a particular gown, varied more considerably in size: Edward III in 1342 bought furs of squirrel made of anything from 80 to 760 skins, whereas the standard fur of eight tiers used only 120." (The English Fur Trade).
Also in this example- "a gown made in 1531 at a total cost of £66. 16s. 4d. The eleven yards of black Lucca velvet cost £10. 7s., and 12s. was charged for the making of the gown; the 1,046 ermine skins cost £34. 17s. 4d., the 18,000 'powderings' £9 and the sum of £12 had to be paid for the work on the skins."
The 11 yards of velvet is similar to the yardage of my pattern, without bombard sleeves, which were out of fashion by then. The amount of skins ordered seems that there wasn’t many extra skins ordered. Indicating they were individually pieced for the specific garment, and presumably the nap of the fur would be the same direction.

This is an old sketch, but the concept is the same, I'm adding 4 more body panels, 2 at each side, and 2 more panels in each sleeve, following the alternating nap pattern.
One thing to keep in mind when cutting and sewing a Houppelande is that you always want to be sewing a bias edge to a straight edge. It was what was done on the extant, and there are 2 reasons for this.
One, the straight edge stabilizes the bias edge, minimizing the stretching that will occur.
Two, the bias to straight orientation creates a natural pleating drape effect that is prevalent in the images.
Bonus effect of keeping the nap alternating in a pretty way.
There are small tailoring things that will need to be adjusted during the mock up phase, such as adding the neck and arm holes, smoothing out the hem, the collar and the exact orientation of the sleeve head, so the longest back seam is at the back of the sleeves.